At the weekend I took part in the Sewing Weekender, for those of you that don’t know this is an event that usually takes part in Cambridge in the UK and involves about 100 sewist coming together for a weekend of sewing and chat. I think it has been running for about 4 years now and is organised by Charlotte Powell (@englishgirlathome) and rachel and Kate (@thefoldline) I have never been to the live event – tickets are like gold dust and sell out almost instantly.
This year things were different, the event was originally planned for the end of August but due to the pandemic and lockdown it was cancelled and then made into an online event that people from across the world could sign up to. The tickets only cost £12.50 and nearly 2000 were sold with all of the money going to charity.
I had a great time, there were loads of videos to watch with sewing chat which I listened to whilst I worked on my project, each day also involved a zoom chat that you could join and you were able to join in the chat if you wished or just listen to everyone else and see what folk had been making. I also have a couple of sewing friend who I chatted to online throughout the day.
So onto what I made: I spent the weekend working on the Dayo dress by Sewing Pattern by Masin.
https://www.sewingpatternsbymasin.com/sewing-patterns/dayo-dress-and-blouse-pdf-pattern
This is a new to me pattern company which I only became aware of a few months ago when Kate from the Foldline mentioned it over on YouTube, I just loved the look of the sleeves and the neckline detail so added it to my ‘must have’ patterns list. Around the same time I purchased some lovely viscose from Material girl Laura and that was earmarked for the pattern.
I didn’t actually get round to buying the pattern until a week before the Sewing Weekender when the Foldline offered a discount code for the patterns on their site, they also offer a printing service for pdf patterns so I used that – I am not a fan of sticking together if I can avoid it.
The pattern suggests about 220cm of fabric for the dress and I only had 200cm , usually I find that I can get way with less but i did have to play about with the pattern pieces in order to get them to fit. I actually took 3 inches off the skirt pattern pieces (I am oly 5ft 2″) and then had to cut the sleeves selvedge to selvedge, it’s a busy pattern so I don’t think it’s obvious the the flowers are running in a different direction on the sleeves.
Size wise my measurements put me at a small bust, large waist and medium hips, because of the elastic round the waist and looking at the finished measurements I went with the small bust and then graded to the medium.


The pattern dives right into the hardest part first with the tucks on the neckline. Viscose isn’t the easiest of fabrics to work with so I found the best way to do it was to put pins in all the tuck markings and then bring the pins together in turn pinning the fabric to the ironing board as I went. Once I was happy with all the positioning and had both sides of the neckline balanced I ironed the tucks into place and then headed to the sewing machine to tack them down.
The back of the bodice has a split from the top of the neckline and the raw edges are just folded over and sewn.
The pattern only uses a 1cm seam alowance, I would of preferred a 1.5cm seam so that I could of used french seams along the side seams for a really neat inside but there was not way I was going to manage them with only 1cm and fraying fabric so i overlocked all my seams instead.
In order to get the puffed sleeves you need to use shirring around the wrists. I have only done this once before and it is best to practice first on a bit of scrap fabric to get the tension right, when you first sew it doesn’t always look as though the elastic is gathering the fabric that much but the more rows you do the more it will come in and the magic really happens when you blast some steam over your fabric and the elastic contracts.
The front and back bodice are joined together at the shoulders and the side seams are sewn up before adding the sleeves but I found they went in really easily with no gathering to make them fit.
The neckline is finished off with bias binding and then it suggests a hook and eye at the top of the back opening. I didn’t have one so used a bit of elastic and a button which I think works just as well.

So that was the bodice finished and then onto the skirt which is just sewn up at the side seams and then the skirt can be attached to the bodice. The shirring then needs to be done along the top of the skirt section, it’s exactly the same method as the sleeves just on a bigger scale.
So this is my Sewing Weekender Dress and I absolutely love it:
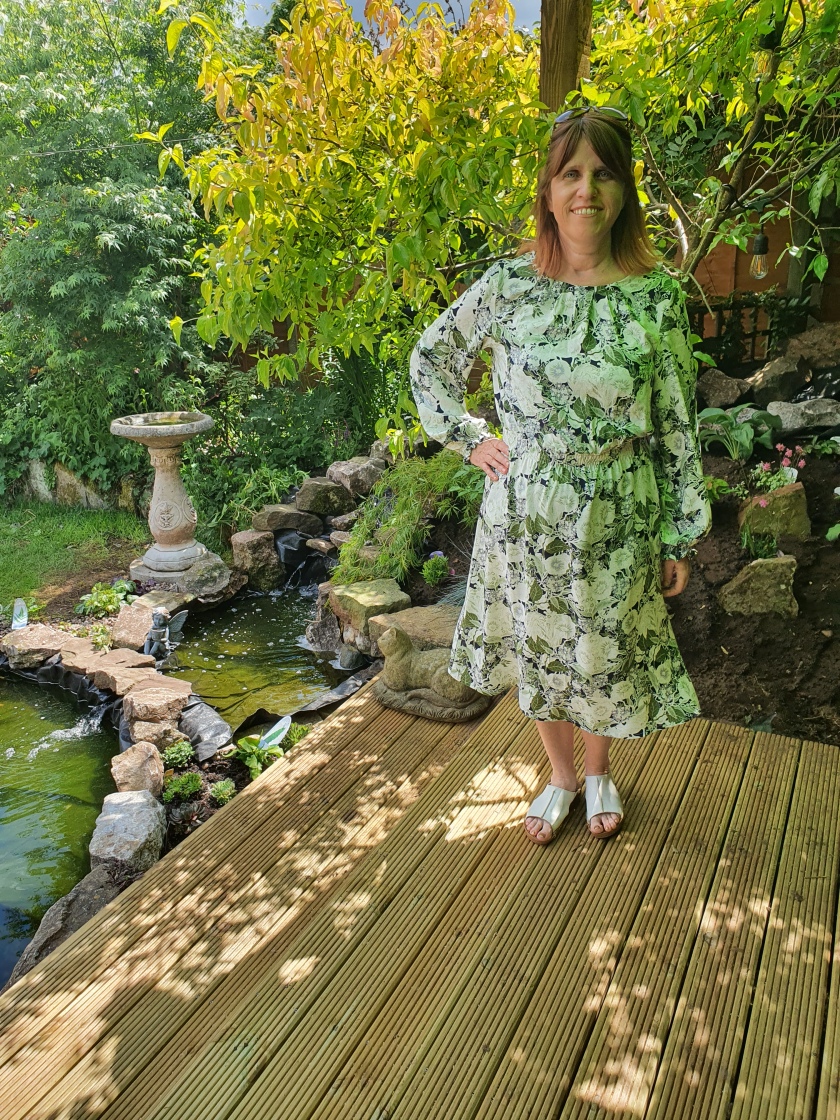

For now I will have to enjoy flouncing round the garden in it until lockdown is lifted and we can go out for a nice meal.
 I recently made the Jenny trousers, I had been looking for some wide leg trousers patterns for a while when I first spotted the Closet Case Jenny and seeing as they are my namesake it seemed the obvious choice. I first tried out this pattern about 6 months ago with some fairly light weight linen from Sewisfaction.


 Another thing I changed was the zipper were I replaced the pants zipper with a concealed zip. I still haven’t got the zip attachment down to a fine art and it isn’t totally concealed but I am happy enough with it and I now know how to continue the seam down nicely after the bottom of the zip, I used to get into all sorts of problems with this and have had gaps between the bottom of the zip and the rest of the seam or unsightly bumps but I read a handy tip a while ago that instructs once the zip is in place sew the rest of the side seam starting just above the zip end and just behind/inside your seam allowance.


